December 17, 2013

Christmas Lights Hair Do!

2nd last day of school today for Little Miss Giggleberry - woohoo!!!! (I can. not. wait. for Thursday mornings lazy start!!)
Anyway today is Christmas Party day at her school so all the kids were allowed to wear mufti clothing and were also asked to bring a plate of food to share with their class mates. In the festive fun I thought why not do something fun with her hair too...

With a small battery operated pack of christmas lights I made a braid down each side of her hair while weaving in the lights. Any extra cord between the lights I pinned under the hair as best I could to keep it out of sight. The end of the cord is then fed down the back of her shirt and the battery pack is in her pocket so she is able to turn it off and on as she likes.

This is really easy to do and got lots of giggles and gasps from the kids and teachers this morning when I dropped her at school. It would be the perfect hair style to do if you were heading to a night time Christmas party or Carlos by Candlelight.

Giggles

December 5, 2013

Lollipop Class Christmas Card!

Spotted over HERE on Makerland, this is such a simple but fun way for your kiddies to hand out a Christmas card/class gift this year. I had this all done in such a short space of time so even with 20 days now till Christmas day you will have plenty of time to get these done.


How To:
(1) Take a photo of your child (have them stand with their hand in a gentle fist out to the side but infront of them). These can be as fancy/dressed up/set up with a particular background etc as you want. I honestly snapped these of my kids on a school morning after breakfast with my iPhone.


(2) Upload the pics to Picmonkey (or photo editing site of your choice). I cropped the pics a bit making sure the side I planned to have the lollipop go in the hand had more space. Picmonkey is also where I added the text to the photos - my kids chose the colours and fonts with me.


(3) Print! I don't have a printer at the moment so we went to Officeworks to print ours off. I did them in a smaller square size rather than a regular 4x6 photo size but this is completely up to you.
(4) Grab some lollipops. I happen to spot a bucket of mini Chupa Chups while we were in Officeworks - Perfect!!
(5) With a sharp box cutter/craft scalpel slice a small slit in the photo just above the childs fist and just below too.
(6) Feed the stick of a lollipop thought the two slits to make it seem like the child is holding it.


Told you it was simple! Now sit back and watch your kiddies have a ball handing these goodies out!

Giggles

October 18, 2013

Crazy Hair Day - Mr Potato Head!!

Today was Crazy Hair Day at little Miss Gigglebrry's school. Most schools and preschools hold a day like this yearly and most kids come with teased up and colour sprayed hair.... I wanted to do something a little different.
Inspired by a pic I spotted on Pinterest we pulled out our mini Mr Potato Head toys and hairspray and started to play!!

This was really fun and different hair style that, let me tell you, got sooooooo many compliments, "wow's", "oh my's" and "how did you do that's" - it needed it's own blog post!!

A basic how to:
* I did an upside-down braid from the base of the head just to half way up the head and secured with an elastic. Then brushed the end of the braid and the rest of the hair into one ponytail right ontop of the head. Secured with lots of hair spray and a tight hair tie.

* Open the ponytail out to find the middle of it and so a little but of hair is hanging down all around the head. Lightly spray the toy potato with hair spray and place it ontop of the opened hair. Close/wrap the hair up and around the potato so you can not see any of the toy. Secure with another hair tie tightly and a bit more hairspray.
* Poke your choice of Mr Potato Head face pieces into the potato.... we decide to not do arms but you absolutely could add arms in the side too.
* Split the hair right ontop of the potato in two and secure with two hair ties.

We then added a little glitter hairspray just for fun too.

Have fun!!
Giggles

October 15, 2013

Bridesmaid Dress to Baby Blanket!

Just two short years ago one my sisters married the man of her dreams and I was lucky enough to be one of the three bridesmaids who walked down the aisle before the gorgeous bride.

(That's me and 'the dress' on the far right)

Fast forward two years to current day and more exciting news can now be shared. The 'newly weds' are now expecting their first bubby - YAY!!!

Of course, as 'Aunty Amy' to be, I had to create some sort of unique gift to give the excited parents. So into the depths of my cupboard I went and dug out the very bridesmaid dress I wore for their wedding (and haven't worn once since) and I attacked it with my sewing scissors....

With a few other coordinating and super cute fabrics I pieced together a piece of their wedding day into a quilt for their bubby!!

Giggles

October 14, 2013

Lil' Miss Whippy - Cozy Coupe Makeover!


100% inspired by some very clever and creative people I came across online I just HAD to give a Cozy Coupe makeover a go as a first birthday gift for my Niece.
I scored the 2nd hand, ride in (Playschool brand) car, for $20 on eBay. A quick inspection showed me that the two screws on the front of the roof were the only "hardware" so I undid them the the rest of the car kind of puled/popped apart easily. I also popped off the back wheels without any tools - they then literally popped back in place when it was re-assembled.

Master Giggleberry was my little helper for this part and together we got to scrubbing and cleaning and peeling off the stickers. We then wrapped the steering wheel, tyres, and any other bits I didn't want painted, with newspaper and painters tape.

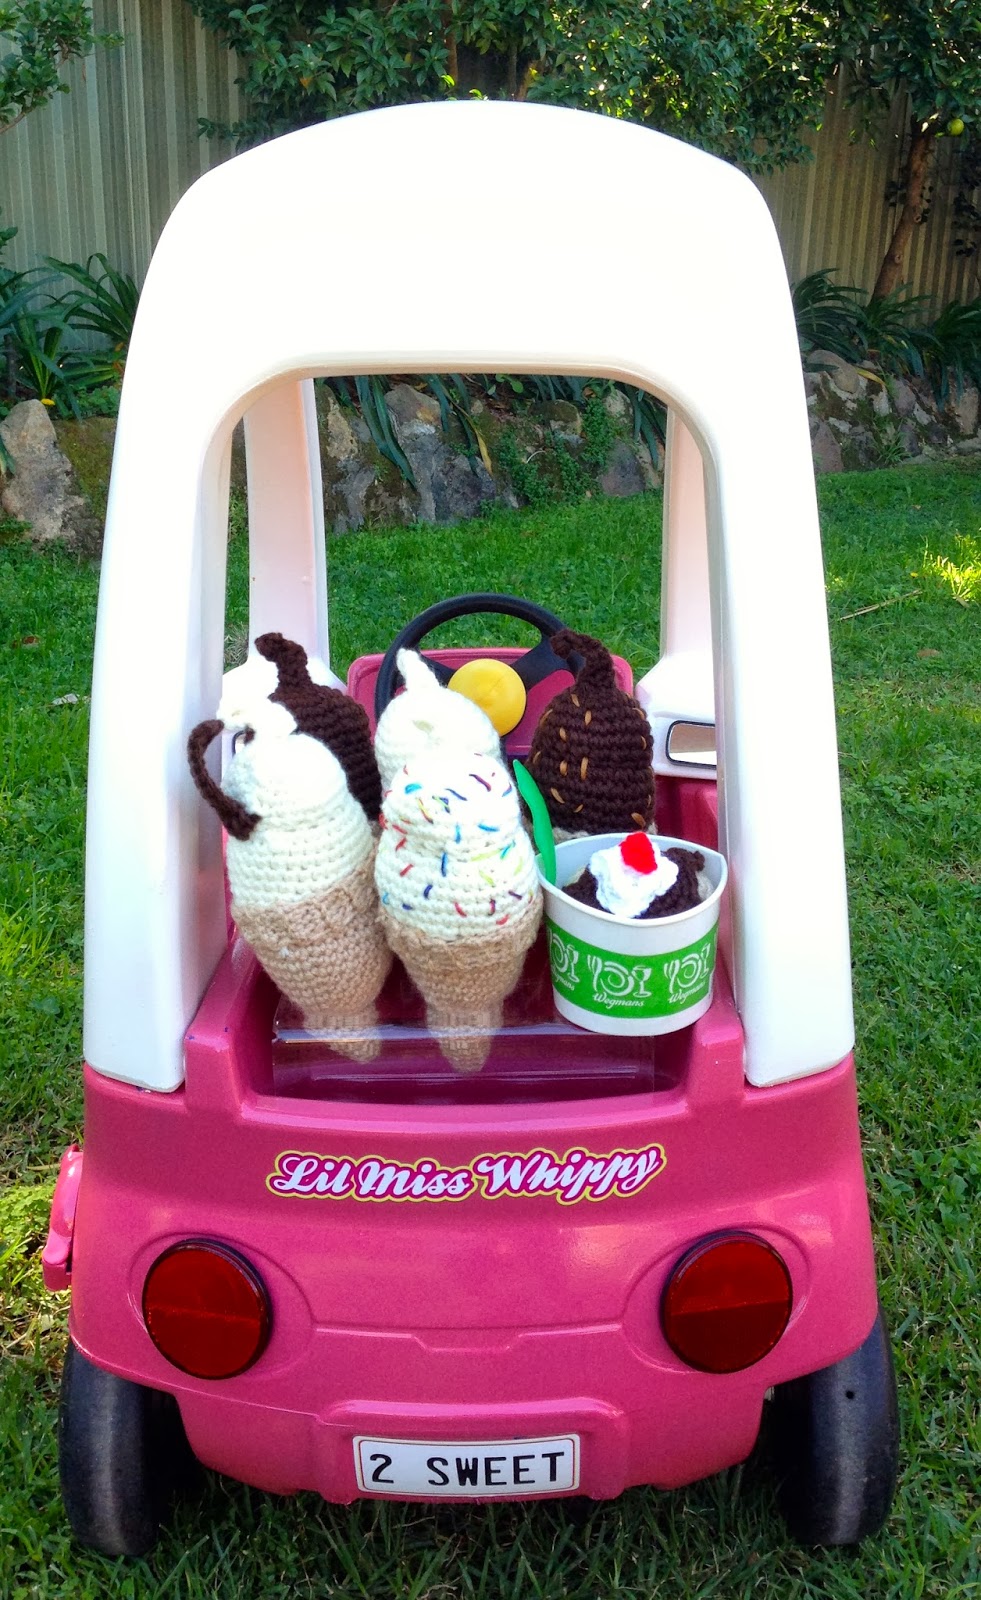
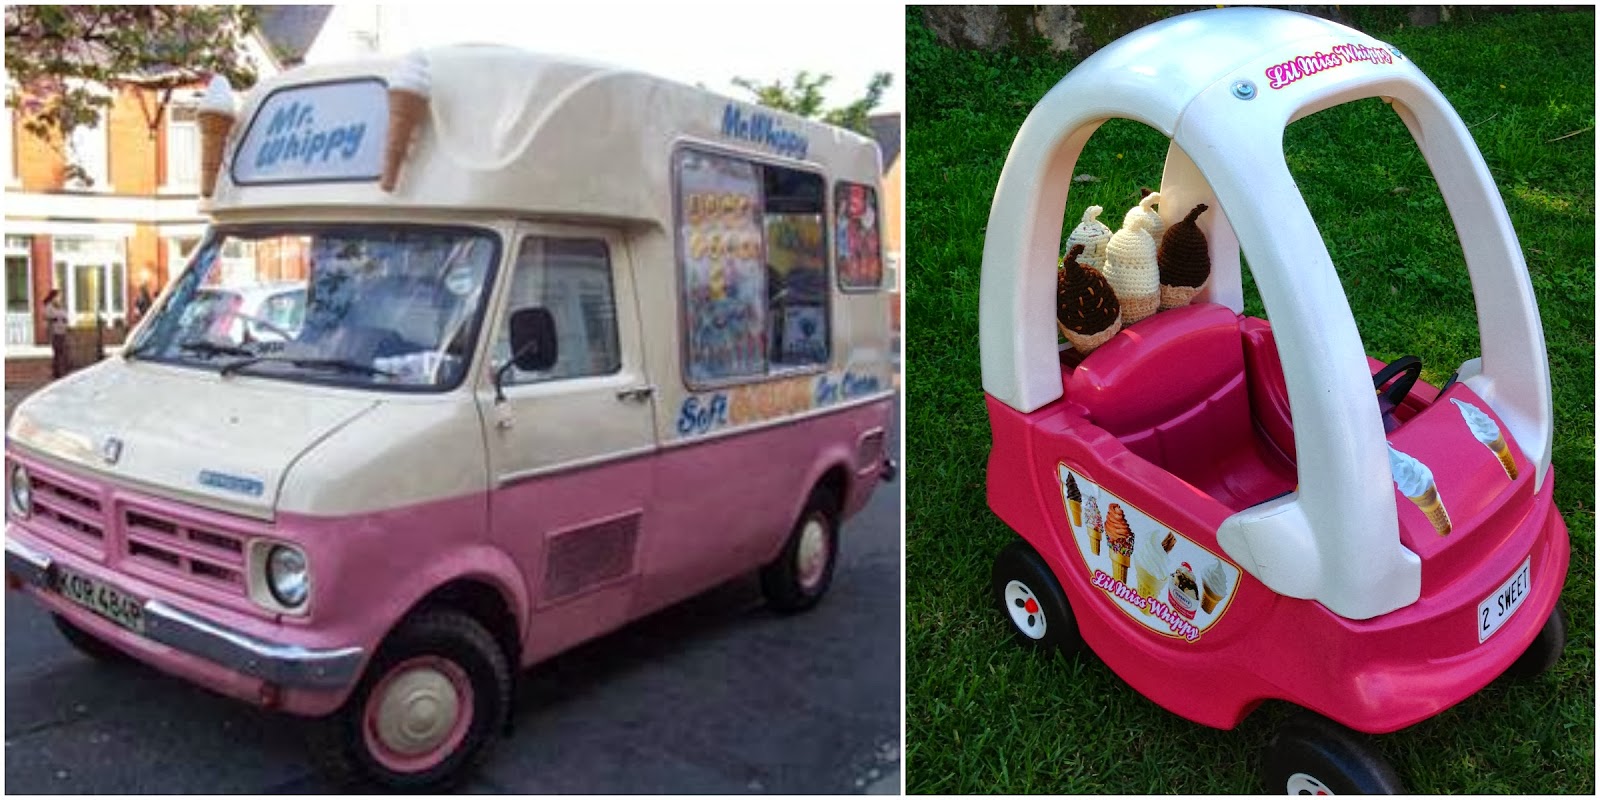
I had decided to turn the car into a mini version of the classic Mr Whippy Vans. You know the kind, pink on the bottom, white on the top playing 'Green Sleeves' as it slowly cruises the streets on a summer night. So a quick trip to Bunnings to find the perfect colours in spray paint and some cardboard boxes thrown down to protect our pavers and I was spray painting away! It did take a few coats to fully cover the blue nicely and I probably went through 3 cans of pink spray paint in the end.

Next I hopped on good old eBay and found stick-on reflector lights and mini mirrors. I also measured up the 'boot' of the car and found the perfect clear perspex icecream cone holder to fit it.

Back together it all went and was starting to look the part!

We needed some 'branding' I thought so with a quick email to the every so lovely Christina of CC Design Management and some measurements I took of the car we created the Lil Miss Whippy, number plates & ice cream stickers.

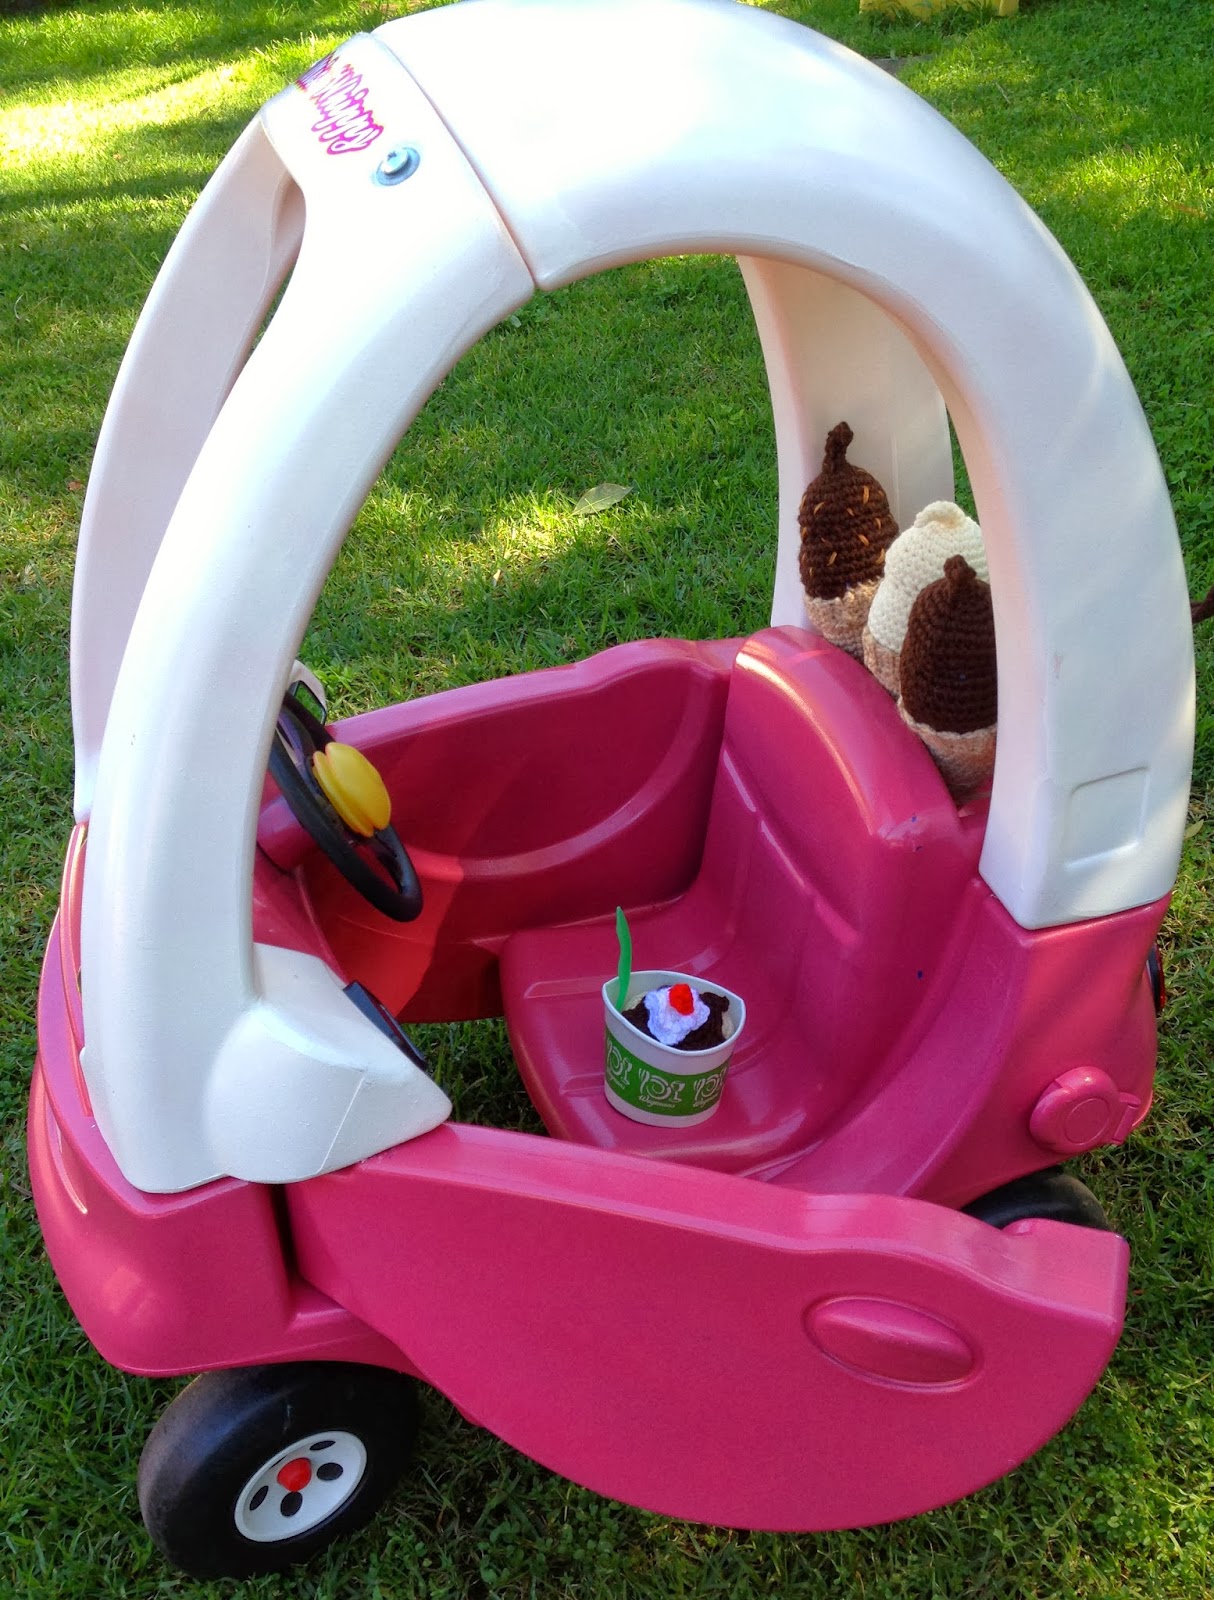
Now, no ice cream truck is complete without a selection of soft serve cones. This was all sorted by one very talented lady I found on etsy. You must check out Duncan Creative by Karen Swimmer. Her amazing crocheted designs!! Karen made a bundle of soft serve ice creams in different flavors and toppings just as I requested and then even made a sundae in a cup too!!

They fit perfect in the ice cream holder on the back of the car and Ta Dah we were ready to roll!!

Wrapped with a big bow this bargain car I found on eBay was very well received by my cutie pie niece and will hopefully see lots of love!

Giggles

September 6, 2013

Happy Friday Find!

We are going to pretend it hasn't been FOREVER and a day since my last Friday Find post and move right along here....
How could I not share these fabulous handmade Bunting Earrings from Mujoyas? They have gone straight to the top of my wish list!!


I reckon they would go with almost any outfit!!
Happy Friday xx
Giggles

August 21, 2013

Supercalifragilisticexpialidocious Book Week!

I love a good excuse to create a costume so Book Week for me can't come around fast enough! I fondly remember the characters I went to school as many years ago and I got rather excited when Little Miss Giggleberry bought home a note a few weeks agao letting us know they too were to dress up as a character from a book.
We had a flick through our book shelves and narrowed costume choices down to either Cruella DeVille (from 101 Dalmatians) or Mary Poppins. (I have to be honest I was hoping and pushing for Grug but had not even the hint of a yes on that one. Maybe Master Giggleberry will say yes to that one in a few years time).
Mary Poppins won the vote and so I got to digging through the cupboards.
One white button up shirt - Check. I just sewed a ruffled ribbon to the front to give it a 'Victorian look'
One black skirt - Check.
Black tights - Check.
Black shoes - Check.
Some red ribbon for the belt and neck tie - Check.
Black Umbrella - Check. You could get a little more creative and make a parrot head to attach to the handle too.
Pattern bag to look like Mary's magic carpet bag - Check.
We were on a roll! I dashed out one late Thursday night and spent the total of $6 buying a white gloves, a black hat, some fake flowers and cherries. My hot glue gun made short work of it all and Mary Poppins was complete!


My little Mary Poppins was very pleased and looked the part, if I do say so myself!


She even won best dressed in Kindergarten at todays Book Week parade!

Giggles